Beginner's Guide to Canning
October 12, 2020
By Glenn Ubertino - M# 1234
Thanks to COVID, 2020 has been a big year for lawn and garden stores everywhere. Gardening and homesteading in general have seen a resurgence this past summer and the fall will not be any different. This harvest season, instead of visiting apple orchards and pumpkin patches, many people will be spending time harvesting their own bounties. With so many people looking to preserve the fruits of their labors, canning supplies are already becoming hard to come by. When you do manage to get your hands on a set of jars, it’s important to know how to use them properly. Food that is improperly preserved can be breeding grounds for bacteria like E. coli.
There are two different methods for canning food: water bath canning and pressure canning. Water bath canning is the easier of the two, but the selection of foods you can preserve this way is limited to acidic foods like tomatoes, pickles, jams and jellies. The pressure canning method can be used with a much wider selection of foods but requires a little more skill and some specialized equipment. Today, we are just going to cover water bath canning.
The Equipment:
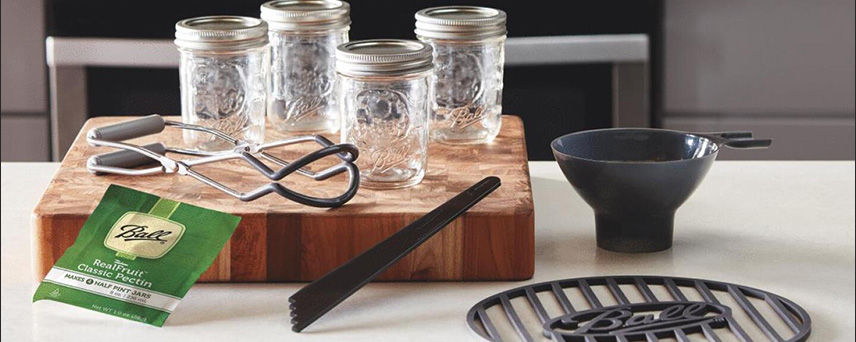
There is no need for fancy canning equipment for water bath canning. In fact, you probably have everything you need in your own kitchen. If you are missing anything, click on an item in the list to follow the link to our catalog. To get started, you will need:
- A large pot – wide enough to hold whatever size jars you have, plus enough water to cover them.
- Glass canning jars
- Canning lids and rings
- Canning funnel
- Jar lifter
- Lid lifter
- Recipe guide of your choosing
Need more than one? This nine-piece starter kit has everything you need.

The Process:
You have your equipment. You have the absolute best selections from your garden. Now what?
- Clean and sanitize your jars. This is the most crucial step. Run your jars through the dishwasher by themselves. When the dishwasher stops, leave the jars on the dry cycle to keep them warm. It is important to keep the jars warm as you are filling them. If you place cold jars in the boiling water, the sudden change in temperature could cause them to crack.
- Wash and prep your vegetables. Make sure they are free of dirt and debris. Preparation will vary depending on what vegetables you are working with. Squash and zucchini will need to be cut into pieces, while cucumbers can be left whole if you are pickling them. Check your recipe guide for specific instructions.
- Fill your canning pot with water and bring it to a boil. If you have a canning rack, lay it in the pot. The rack keeps the jars from rattling and banging against each other and the side of the pot. If you do not have a rack, line the pot with a dish towel and leave some space between the jars.
- In a small sauce pot, bring water to a boil and add the lids. This will sanitize the lids.
- Take the jars out of the dishwasher one at a time. Use the funnel to fill the jar with your vegetables. Leave about a ¼ inch of head space between your vegetables and the mouth of the jar. Use a clean dish towel to wipe any drips from the mouth of the jar.
- Use the lid lifter to pull a lid from the boiling sauce pot and place it on the jar.
- Screw on one of the lid rings until it is just snug enough to hold the lid on.
- Place the jar in the canning pot.
- Repeat steps 5-7 until you have enough cans in the canning pot. Make sure there is enough water to cover the cans up to the rings.
- Allow the jars to boil for 10-15 minutes. Check your recipe guide for specific boiling times.
- Use the jar lifter to carefully pull the jars from the water. Set them on a dry dish towel to cool. As they cool, you will hear a series of pops as the lids seal down on the jars.
- Check each jar to make sure the lids are sealed and firm. If the lid moves and pops when you push on it, it is not sealed. Do not store an unsealed jar. Either boil it again or eat the contents within the next week. When the jars are sealed, tighten down the rings.
Canned foods have a long shelf life. You can store your canned goods for up to six months. They make excellent holiday gifts! Enjoy!